Are you a passionate fisherman? Do you know how to rig different bait for various types of fish? If not, then it’s never too late to learn! In this guide, we’ll be focusing on how to rig a shad.
Rigging a shad is an essential skill for anglers aiming to maximize their success in catching fish. Shads, known for their realistic motion in the water, are highly effective fishing lures that mimic the appearance and movement of baitfish. Properly rigging a shad can make all the difference if you’re targeting bass, pike, or other predatory fish.
This guide will walk you through the fundamentals of rigging a shad to ensure it swims naturally and attracts your desired catch. With a bit of practice, you can prepare your shad lure with confidence and precision.
What Are the Benefits of Using a Shad Lure?
Before we dive into the rigging process, let’s first understand why shads are one of the top choices for anglers. Here are some of the benefits that make this lure a go-to for many fishermen:
- Realistic Action: Due to their soft bodies and multiple joints, shad lures have a lifelike swimming motion that is irresistible to predatory fish.
- Versatility: Shad lures come in various sizes and colors, making them suitable for different types of fish and water conditions.
- Durability: Unlike live bait, which can die quickly or get stolen by smaller fish, shads are durable and reusable.
Now that you know the benefits of using a shad lure, let’s move on to how to rig it correctly.
What Will You Need?
To rig a shad, you’ll need the following items:
- Shad Lure: You can purchase a pre-rigged shad lure, buy the components separately, and assemble them yourself.
- Hooks: Choose a hook size that complements the size of your shad and is suitable for the type of fish you’re targeting.
- Fluorocarbon Leader: This clear, firm line will lead between your main fishing line and the shad lure.
- Split Rings: These small metal rings are used to attach hooks and weights to the main body of the shad.
- Weights: Depending on your desired depth and water conditions, you may need weights to ensure your shad sinks and swims properly.
Once you have all the necessary tools, it’s time to rig your shad.
10 Easy Steps on How to Rig a Shad
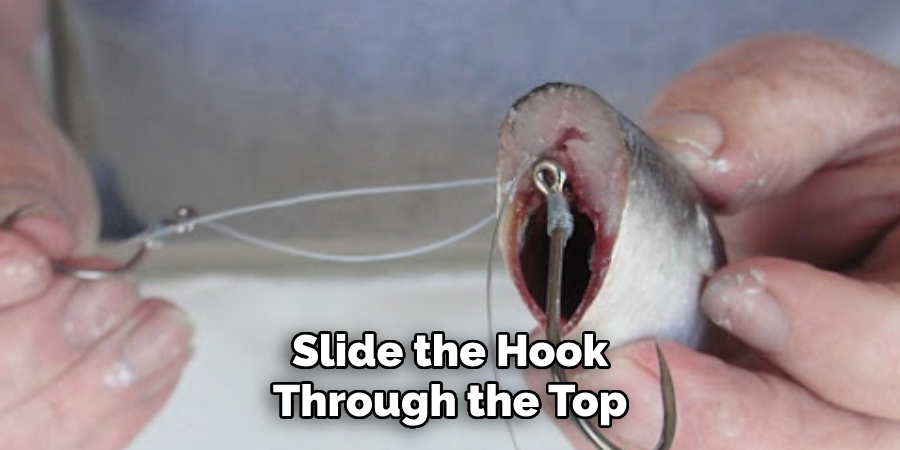
Step 1. Attach the Hook
Begin by selecting the appropriate hook for your shad and fishing target. Slide the hook through the top of the shad lure’s body, just behind the head, and guide it carefully so that the hook’s point emerges from the underside. The shad should sit securely on the hook without being overly bent, ensuring it maintains a natural swimming action. Ensure the hook is centered, as an off-balance rig can cause the lure to swim unnaturally, reducing its effectiveness.
Step 2. Attach the Split Ring
Take the split ring and use a pair of split ring pliers to open it gently. Slide one end of the split ring onto the eye of the hook that you just attached to the shad. Ensure the split ring rotates freely around the hook’s eye once secured. This will allow for better movement of the hook and assist in creating a more realistic swimming motion for your shad lure in the water. The split ring also helps reduce stress on the fishing line by providing a more flexible connection point, which can be especially helpful when dealing with firm fish or swift currents. Double-check that the split ring is securely placed before proceeding to the next step.
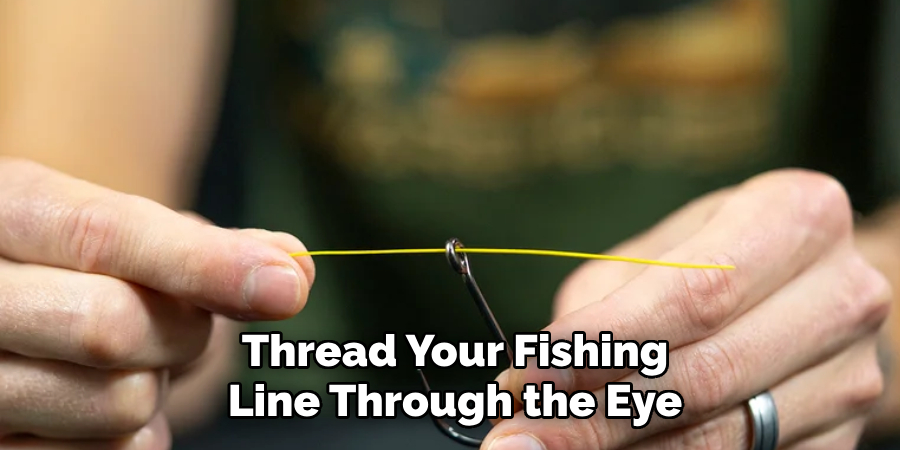
Step 3. Attach the Fishing Line
Thread your fishing line through the eye of the split ring and make a firm knot to secure it in place. A reliable knot, such as the improved clinch or Palomar knot, is recommended to keep the connection firm under pressure. Carefully tighten the knot and trim any excess line to avoid tangles during casting or retrieval. Test the connection by gently pulling on the line to confirm that everything is secure. Ensuring a solid connection at this stage is crucial for maintaining control and avoiding line breakage when reeling in a catch.
Step 4. Attach the Shad Lure to the Split Ring
Carefully attach the shad lure to the split ring by sliding the lure’s attachment point onto the split ring. Rotate the divided ring until the lure is securely seated, ensuring it moves freely without obstruction. This connection should allow the lure to effectively mimic natural movements in the water. Double-check that the lure is aligned correctly and the split ring is not twisted or bent, as this can impact the lure’s performance. Once attached, your setup is ready for casting and attracting fish.
Step 5. Casting the Line
With your setup complete, it’s time to cast the line. Hold the rod firmly with one hand while keeping your thumb gently on the spool to control the line. Press the release button or flip the bail, depending on your reel type, and bring the rod backward to prepare for the cast. Using a smooth, controlled motion, swing the rod forward and release the line immediately to achieve optimal distance. Practice your timing to ensure the lure lands in the desired spot. After casting, close the bail or engage the spool and prepare to start reeling. Ensure that tension is maintained on the line to stay ready for bites.
Step 6. Reeling and Handling Bites
Once the lure is in the water, begin reeling steadily to replicate the natural movement and attract fish. Pay close attention to any sudden changes in tension or movement on the line, as this could indicate a bite. If you feel a bite, resist the urge to jerk the rod immediately. Instead, wait for a firm tug, then quickly and firmly pull the rod upward to set the hook. Keep reeling while maintaining steady pressure on the line to secure your catch. Remember, patience and practice are key to mastering this step.
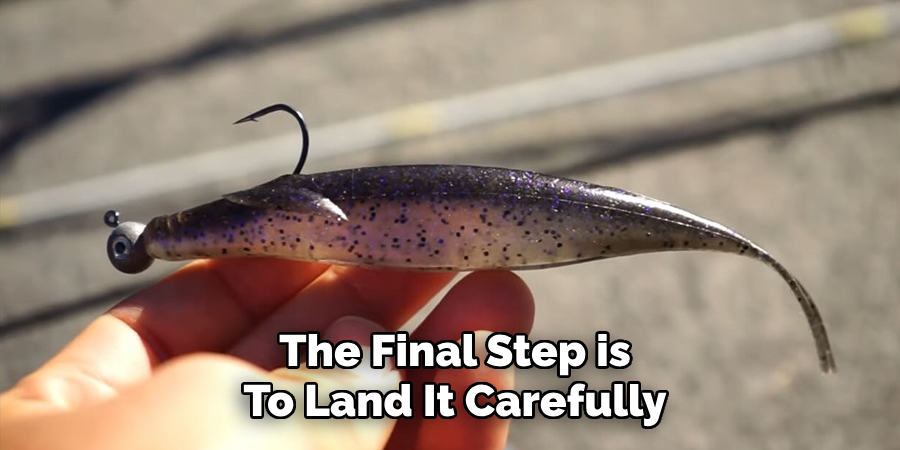
Step 7. Landing the Fish
Once you’ve successfully hooked a fish, the final step is to land it carefully. Keep steady pressure on the line as you reel the fish closer to you, avoiding abrupt or jerky movements that could cause the fish to escape. If you’re using a net, position it beneath the fish and scoop upward as it nears the surface. For anglers without a net, guide the fish gently toward the shore or side of the boat, ensuring a firm yet gentle grip to avoid injury to the fish or yourself. After landing the fish, decide if you plan to release or keep it, and handle it responsibly to preserve sustainability and respect for the sport.
Step 8. Cleaning and Storing the Fish
If you decide to keep your catch, properly cleaning and storing the fish is essential to ensure its freshness and quality. Start by rinsing the fish with clean water to remove dirt or debris. Next, use a sharp knife to gut the fish, removing the internal organs while being cautious to avoid piercing the stomach, which could affect the taste. After cleaning, place the fish on ice or in a cooler to keep it fresh until you’re ready to cook or store it. Proper handling enhances the flavor and demonstrates respect for your catch and the environment.
Step 9. Cooking and Enjoying Your Catch
Cooking your freshly caught fish can be one of the most rewarding parts of the fishing experience. Start by choosing a recipe that complements the type of fish you have caught. Popular methods include grilling, baking, frying, or steaming, depending on your preference and the fish’s texture. Season the fish with herbs, spices, or marinades to enhance its natural flavors. Ensure it is cooked thoroughly, reaching the appropriate internal temperature for safety. Once prepared, savor the flavors of your catch while reflecting on the effort and skill involved in obtaining it. Sharing a meal made from your catch can also be an excellent way to celebrate your fishing adventure with friends and family.

Step 10. Cleaning Up and Maintaining Your Gear
After enjoying your meal, cleaning up and taking care of your fishing gear is essential. Rinse rods, reels, and other equipment with fresh water to remove any dirt, salt, or residue that could cause corrosion or wear over time. Check your lines, lures, and hooks for damage and replace or repair them as necessary. Proper gear maintenance ensures it remains in good condition for your next fishing trip. Additionally, waste, including leftover bait or fishing lines, should be disposed of responsibly to protect the environment and wildlife. Staying organized and conscientious will help you preserve your gear and fishing spots for years.
You can become a successful angler by following these steps and continuously practicing and honing your skills.
Conclusion
How to rig a shad may seem challenging at first, but with practice and attention to detail, it becomes a straightforward process.
By selecting the right shade, choosing an appropriate rigging method, and ensuring a natural presentation in the water, you can effectively attract the fish you’re targeting. Whether you’re using a jighead, weedless setup, or another technique, the key lies in understanding the behavior of the fish and adapting your approach accordingly.
With patience and proper execution, rigging a shad can significantly enhance your fishing success, making each trip more rewarding and enjoyable.
About the Author
Jennifer Branett is the author of Fishy Kayak and an expert in fish-related fields, with over 10 years of experience. Her work blends passion for fishing with a commitment to conservation.
Educational Background
Degree: Bachelor’s in Marine Biology
Institution: University of California, Santa Barbara
Specializations: Aquatic ecosystems, fish behavior, and sustainable practices
Professional Experience
Conservation Projects:
Collaborated with local organizations to restore aquatic habitats
Developed educational programs on sustainable fishing practices
Publications:
Authored articles for fishing magazines and environmental journals
Featured speaker at fishing expos and conservation conferences
Key Areas of Expertise
Fishing Techniques:
Kayak fishing strategies
Freshwater and saltwater fishing methods
Environmental Stewardship:
Advocacy for sustainable fishing
Promoting biodiversity in aquatic environments
Awards and Recognition
Recipient of the [Specific Award Name] for contributions to marine conservation
Recognized as a leading voice in the fishing community by [Organization/Publication Name]
Community Engagement
Workshops and Seminars:
Regularly hosts events to educate anglers on sustainable practices
Engages with youth programs to inspire the next generation of fishers
Online Presence:
Maintains an active blog sharing tips, stories, and conservation efforts
Engages with followers on social media to promote fishing ethics
Personal Interests
Enjoys kayaking in scenic locations
Passionate about photography, capturing the beauty of nature
Advocates for local conservation efforts in her community